I was taking a look at some of the release notes for esx 3.5 update 3 and noticed a VMDK recovery tool. This is experimental and has tons of warnings, but in some cases it may work for rudimentary backup, and looks to foreshadow some possible backup features to come. There is a script intended to help customers to recover VMFS and VMDK data stores from accidental deletion of a data store or physical disk corruption. Basically looks to be a very basic backup and recovery functionality. Check out this KB link it goes through an example:
http://kb.vmware.com/selfservice/microsites/search.do?language=en_US&cmd=displayKC&externalId=1007243
Sunday, January 11, 2009


Monday, December 29, 2008
NDMP Shortcut for Celerra
Here's a quick primer for setting up NDMP on the Celerra. This post is assuming that you are working with FC tape device and you have it connected to the aux port for the datamover on server_2. Note that configuring the NDMP option on the celerra has you shutting down the data movers, and that means no access to CIFS or iSCSI Luns that are published through the Data Movers, so plan accordingly!
From the Control Station, halt each Data Mover to be connected to the TLU and confirm it has halted by using this command syntax:
- $ server_cpu -halt -monitor now
server_cpu server_2 -halt -monitor now
- Type /nas/sbin/getreason and ensure that the status is powered off.
Cable each Data Mover to the Tape Library.
Turn on the Tape Library and verify that it is online. Restart each Data Mover connected to the Tape Library and confirm it has restarted by using this command syntax:
- $ server_cpu -reboot -monitor now
server_cpu server_2 -reboot -monitor now
- This could take 5 minutes or so…
After the Data Mover restarts, verify that the Data Mover can recognize its Tape Library device by using this command syntax:
- $ server_devconfig -probe -scsi –nondisks
server_devconfig server_2 -probe -scsi –nondisks
Save the Data Mover’s TLU devices to the Celerra Network Server database by using this command syntax:
- $ server_devconfig -create -scsi –nondisks
CAUTION: In a CLARiiON environment, before you run the server_devconfig -create command, verify that all paths to the Data Mover are active and no LUNs are trespassed. Running this command while paths are inactive causes errors in the Data Mover configuration file.
server_devconfig server_2 -create -scsi –nondisks
List the device addresses by using this command syntax:
- $ server_devconfig -list -scsi –nondisks
server_devconfig server_2 -list -scsi –nondisks
- The output will look similar to:
Server_2 :
Scsi device table
name addr type info
jbox1 c1t0l0 jbox ATL P1000 62200501.21
tape2 c1t4l0 tape QUANTUM DLT7000 245Fq_
tape3 c1t5l0 tape QUANTUM DLT7000 245Fq_
To assign a user account name and password to one or more Data Movers, log in to the
Control Station as nasadmin and switch user to root by typing:
- $ su
- Type the root password when prompted.
- To create an account, use the appropriate command syntax, as follows:
Text method: - # /nas/sbin/server_user -add -password
MD5 password encryption method: - # /nas/sbin/server_user -add -md5 -password
/nas/sbin/server_user server_2 -add -md5 -password NDMPuser
- The output will look similar to:
Creating new user NDMPuser
User ID: 1000
Group ID: 1000
Home directory:
Changing password for user NDMPuser
New passwd:
Retype new passwd:
server_2 : done
Now you are ready to configure the backup solution to the celerra. This process will vary depending on the backup software. Basically, the next step is to add the NDMP server to the backup server using the ip address or hostname of the data movers and use the credentials you setup above. This will allow you to see the CIFS shares on the backup server, and will allow you to create a media set for the tape device and create backup jobs for the CIFS data.
Sunday, December 21, 2008
More Avamar Basics
My last blog went through a basic intro to Avamar. I'll pick up where I left off and go through some of the basic configurations that are supported, and when to use them.
Avamar Server Node Types:
Avamar Server Node Types:
- The Utility Node is the brains of the avamar server. It is dedicated to providing the internal server processes including the administrator server, cron jobs, scheduling, DNS, authentication, NTP, and web access.
- The Data Storage Node is where all the data resides. Once the data is backed up and deduped from the client, it is stored on the Data Storage Node.
- The NDMP Accelerator Node is an option node for providing backup and recovery solutions to NAS devices like the Celerra.
- Single Node. Also known as the Non-RAIN (Redundant Array of Independent Nodes) configuration. This is the entry level configuration in which the single node acts as the utility node and the data storage node. When using this configuration 2 single nodes are needed. 1 is the main backup node, and the 2nd is used for replication purposes for fault tolerance. Used in small to medium sized environments for a max of 2 Tb of storage.
- Muti-Node Non RAIN. This is basically is a 3 node setup consisting of 1 Utility Node and 2 Data Storage Nodes. It allows for double the storage capacity of a Single Node device.
This configuration also needs a duplicate setup for replication, so a total of 6 Nodes would be needed for fault tolerance. Used in medium sized environments with a max of 4Tb of storage. - Multi-Node RAIN. The Standard RAIN configuration has 1 Utility Node, 4 Data Storage Nodes and 1 Spare Node. This configuration can be expanded for a total of 16 Data Storage Nodes max. All of the nodes work together to balance the storage equally across all of the other Data Storage Nodes. This architecture is easily scaled from 6Tb to 32 Tb by adding as many Storage nodes as necessary. Typically used in large environments, this configuration can be initially setup with 3 Storage nodes instead of the standard 4 Storage nodes. It is recommended to setup a duplicate Multi-Node RAIN for replication, typically at a DR site. Although it is recommended, it is not a necessity like the Non-RAIN configurations, because there is a spare node that can be configured at any point for fault tolerance.
- Virtual Appliance. The Virtual Appliance is a software-only solution that comes in either .5 Tb or 1Tb editions. The appliance is essentially a vm of the Single Node version with the same characteristics. It is installed in ESX environments and is ideal for small environments or remote facilities.
Monday, December 15, 2008
What exactly is Avamar?
Avamar from EMC has a refreshing new twist on the backup world. This solution utilizes backup to disk hardware and client software installs to create a client-server network backup/restore solution while using a unique de-dupe technology.
Traditional Backup solutions have some significantly inherent problems. A high-percentage of data that is retained on backup solutions is redundant data. Typical strategies consist of daily incremental backups and weekly full backups. These backups can be very time consuming, especially when getting the full backups, and yield multiple copies of identical or slowly changing data on backup media. This media then has to be organized and kept off-site for disaster recovery purposes, which often leads to high protection service costs, and high recovery time objectives. In addition, the data itself that is often duplicated across several servers in the case of system files, and many users keep identical or slightly different versions of the same documents. Traditional backups will backup all copies and variations as if they were brand new documents. Backing up redundant data increases the amount of backup storage needed and can negatively impact network bandwidth. The backup window for most organizations gets smaller and smaller the more they grow.
Avamar differs from traditional backup and restore solutions by identifying and storing only unique data objects. Redundant data is identified at the source, which reduces the amount of data that actually needs to travel to the backup server node. Avamar utilizes a chunk and hash methodology to break down all files into smaller chunks of data to send to the backup node. Unique hashes are generated from this data that gets stored on the backup node. If a client tries to send the same data, the backup node will respond that it already has that data and does not need another copy. Only new, modified, or changed chunks from the original files will be sent to the backup node.
Some of the key features:
Traditional Backup solutions have some significantly inherent problems. A high-percentage of data that is retained on backup solutions is redundant data. Typical strategies consist of daily incremental backups and weekly full backups. These backups can be very time consuming, especially when getting the full backups, and yield multiple copies of identical or slowly changing data on backup media. This media then has to be organized and kept off-site for disaster recovery purposes, which often leads to high protection service costs, and high recovery time objectives. In addition, the data itself that is often duplicated across several servers in the case of system files, and many users keep identical or slightly different versions of the same documents. Traditional backups will backup all copies and variations as if they were brand new documents. Backing up redundant data increases the amount of backup storage needed and can negatively impact network bandwidth. The backup window for most organizations gets smaller and smaller the more they grow.
Avamar differs from traditional backup and restore solutions by identifying and storing only unique data objects. Redundant data is identified at the source, which reduces the amount of data that actually needs to travel to the backup server node. Avamar utilizes a chunk and hash methodology to break down all files into smaller chunks of data to send to the backup node. Unique hashes are generated from this data that gets stored on the backup node. If a client tries to send the same data, the backup node will respond that it already has that data and does not need another copy. Only new, modified, or changed chunks from the original files will be sent to the backup node.
Some of the key features:
- Global data de-duplication ensures that data objects are only backed up once across the backup environment.
- Systematic fault tolerance, using RAID, RAIN, checkpoints, and replication provides data integrity and disaster recovery protection.
- Highly reliable inexpensive disk storage for primary backup storage.
- Standard IP network technologies. Optimizes use of network for backup, does not require a separate backup network.
- Centralized management. The Avamar Administrator and Enterprise consoles give users full-featured remote management of Avamar servers with robust reporting capabilities.
- Support for Windows, Unix, Linux, NDMP, SQL, Exchange, DB2, and Oracle.
So now that you have some of the basics, check back soon to get a more in depth look to how the different solutions are deployed. There are 3 basic versions:
- Avamar Data Store Non-RAIN (single or multiple nodes with replication)
- Avamar Data Store RAIN (multiple data nodes for fault tolerance)
- Avamar Virtual Edition (virtual appliances versions in .5 and 1 TB)
Wednesday, December 3, 2008
EMC's new CX4
I have recently been some reading on EMC's new CX4 line and thought I should share a little background information. So what all is new???
Bigger, Faster, Better...
Here is a basic breakdown of the models.
Click on the image for a clearer picture.

The CX4 line introduces a new naming convention, that coincides with the number of drives that are supported. Finally, a simple approach to the most popular question regarding the different Clariion models. The only exception is the AX4, which probably should have been named the Ax4-60
There are now modular ports for customizable connectivity.

CX4 & CX3 DAE and Disk Considerations:
NOTE: currently they are only offerred for the CX4-960
Bigger, Faster, Better...
Here is a basic breakdown of the models.
Click on the image for a clearer picture.

The CX4 line introduces a new naming convention, that coincides with the number of drives that are supported. Finally, a simple approach to the most popular question regarding the different Clariion models. The only exception is the AX4, which probably should have been named the Ax4-60
There are now modular ports for customizable connectivity.
- Number of front-end FC ports and front-end iSCSI ports are configurable for each model
- Number of back-end FC ports is fixed for CX4-120,CX4-240,CX4-480
- Number of back-end FC ports is configurable for CX4-960
(choose between 8 or 4 back-end ports per SP) - Front-end connectivity options: FC (4Gbps), iSCSI (1GbE)
- CX4-120 has 6Gb
- CX4-240 has 8Gb
- CX4-480 has 16Gb
- CX4-960 has 32Gb

CX4 & CX3 DAE and Disk Considerations:
- DAE's are the same for the CX3 & CX4 arrays
- 400GB 10k rpm disk with 4Gbps Fibre Channel interface
- 146GB 15k rpm disk with 4Gbps Fibre Channel interface
- 300GB 15k rpm disk with 4Gbps Fibre Channel interface
- 1TB 5400 rpm SATA drive with 3Gbps SATA II interface
(low power)- New Tier 3 storage - 1TB 7200 rpm SATA drive with 3Gbps SATA II interface
- Disk qualifications carry over from CX3
- SATA-II drives can act as Vault drives on the CX4-120 model only
NOTE: currently they are only offerred for the CX4-960
- Support for customized Flash SSD (Solid State Drive)
for high-performance Tier 0 applications - EMC optimized Solid State Drive technology
- Internal SDRAM buffers and pipelining provide maximum performance
- No rotational latency or seek overheads provides incredible response time
- Ideal for low-latency, high-transaction workloads
- Native Fibre Channel interface
- 3.5” form factor for use with existing DAEs
- Flash drives need a separate DAE from traditional disks.
- Configure SATA and FC drives in separate DAEs
- 1TB 5400 rpm low power SATA drive will only be sold as a “15 drives per tray” package (fully populated DAE)
- This prevents mixing with 7200 rpm SATA drives within one DAE
- 1TB 7200 rpm SATA drive as Vault drives
- 1TB 5400 rpm low power SATA drive cannot be used as a Vault drives
Wednesday, November 19, 2008
XenApp 5
I have been in training this week for Citrix, so I figured I should spread the word on some of the things I've learned. The training is all on Presentation Server 4.5, but there was some good info on the new release which is called XenApp 5... But you already knew that. I'll summarize some of the highlights.
Web Interface 5.0 for Windows.
The old web interface was how can I say this politely, less than impressive. There is a very nice face lift for the 5.0 version. Let's face it with all the eye candy out there now a nice user interface is not only the norm, but becomes part of function.
Web Interface 5.0 for Windows.
The old web interface was how can I say this politely, less than impressive. There is a very nice face lift for the 5.0 version. Let's face it with all the eye candy out there now a nice user interface is not only the norm, but becomes part of function.
- Breadcrumb navigation bar which replaces the old Home, Top, and Up links.
- User-selectable views to allow preferred display of published resources, with new features like tree views and group views.
- User-assistance to give helpful hints and help for the end users.
- Simple and Advanced modes for a more customizable look and feel.
- Mobile experience enhancements for the users with hand-held devices and integration with the Access Gateway.
- XenDesktop Support which allows users to access virtual desktops through the web interface.
- Web Interface for Sharepoint which makes it possible to deliver XenApp published apps and resources on to Sharepoint 2007. (Separate install)
- Improved support for Vista and Office 2007.
- Updated menu structure.
- little or no user configuration required.
- Web Interface integration and streamed app integration.
- Password change capability.
- Integration with XenApp Web Plugin and XenApp Plugin to stream apps to the desktop.
- No user configuration required, and seamless integration to the end users.
- Improved inter-isolation communication between multiple applications that are running in isolated profile environments.
- Differential synchronization to reduce latency and improve performance.
- Session-level performance counters.
- Real-time alerting.
- More pre-configurable and customizable and reporting.
- Integration with Health Check Agent.
- Active application monitoring.
- Internet Explorer 5.0 or higher.
- Tomcat 4.1.24.
- JRE 1.6.0_5 or later.
- Apache HTTP Server 2.0.49.
- IIS must be installed prior to install.
- ASP.Net, Windows Authentication Security, and IIS Mangement 6.
- supported on Windows 2000, 2003, and 2008
- Application Performance Monitor powered by Citrix Edgesight. This component adds ICA monitoring, service-level management and more to the Resource Manager feature included in the Enterprise Edition.
- Single Sign-on powered by Citrix Password Manager 4.6 SP1. Password Manager provides secure and managed access to applications running in the Citrix environment as well as the local apps on the desktop.
- Citrix Accelerator Plugin formerly WANScaler Client License. Provides WAN optimization and applicaiton accceleration for home-based, mobile or small office users.
- Citrix SmartAuditor. Records and plays user sessions using policies to automatically trigger the recordings.
- EasyCall. Embeds VOIP like triggers allowing users to click any telephone number in any app to make a call.
Tuesday, November 18, 2008
VSS options in vRanger
For those of you who have used vRanger you may have noticed the VSS option and not fully understood what it means and when to enable it, so here's the skinny...
Prior to ESX 3.5 update 2, there was no good way of running a backup on the vm drives that would actually freeze the vm and get an OS aware snapshot without using their VSS service. That all changed when VMware updated their tools in ESX 3.5 update 2. Now VMware includes their own Snapshot service that does this as well. In prior versions the best option was to use Vizioncore's VSS service to accomplish this task.
Basically there are 2 Scenarios:
Scenario 1:
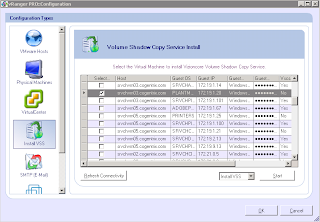
1) Older versions of ESX Server 3.5 update 1 or below, open the configuration window in vRanger. select the Install VSS option. Select the VM and install the service. It should display successful, and will run as a service on that vm in computer management. This service will freeze the writes to the vm when the VSS option is selected during backup.
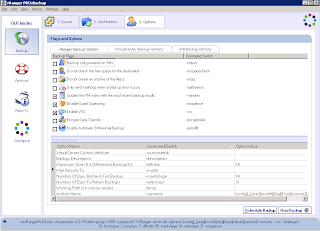
2) The next step is to configure the backup. In this case select the options for disable guest quiescing and enable VSS.
Scenario 2:
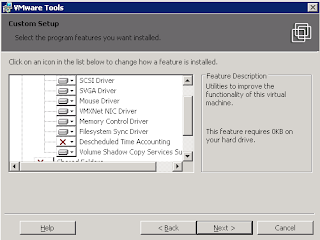
1) When using ESX 3.5 update 2 and later use VMware's "Volume Shadow Copy Sevice Support" from the vmware tools. To make sure this service is installed on the vm go under add/remove programs, select vmware tools, and select modify. Make sure "Volume Shadow Copy Service Support" is installed.
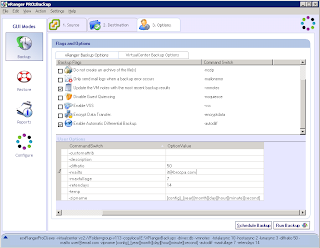
2) Now configure the backup options in vRanger and make sure the VSS option and the disable quiescing options are de-selected. This will allow the vm to freeze the os and using the vmware snapshot to integrate with VSS on the vm OS.
Prior to ESX 3.5 update 2, there was no good way of running a backup on the vm drives that would actually freeze the vm and get an OS aware snapshot without using their VSS service. That all changed when VMware updated their tools in ESX 3.5 update 2. Now VMware includes their own Snapshot service that does this as well. In prior versions the best option was to use Vizioncore's VSS service to accomplish this task.
Basically there are 2 Scenarios:
Scenario 1:
1) Older versions of ESX Server 3.5 update 1 or below, open the configuration window in vRanger. select the Install VSS option. Select the VM and install the service. It should display successful, and will run as a service on that vm in computer management. This service will freeze the writes to the vm when the VSS option is selected during backup.

2) The next step is to configure the backup. In this case select the options for disable guest quiescing and enable VSS.

Scenario 2:
1) When using ESX 3.5 update 2 and later use VMware's "Volume Shadow Copy Sevice Support" from the vmware tools. To make sure this service is installed on the vm go under add/remove programs, select vmware tools, and select modify. Make sure "Volume Shadow Copy Service Support" is installed.

2) Now configure the backup options in vRanger and make sure the VSS option and the disable quiescing options are de-selected. This will allow the vm to freeze the os and using the vmware snapshot to integrate with VSS on the vm OS.

Subscribe to:
Posts (Atom)